本ページでは、Google Brain Team によって開発されたオープンソースの機械学習エンジンである、TensorFlow (テンソルフロー) を利用して、ディープラーニングの一種である、CNN 法 (Convolutional Neural Network, 畳み込みニューラルネットワーク, ConvNet とも呼ばれる) によるモデルを構築して、画像の自動クラス分類器 (判別器) を作成し、実行する方法を紹介します。
もし、まだ TensorFlow をインストールしていない場合は、「TensorFlow をインストール」の手順にてインストール作業を行いましょう。
今回使用するデータ (CIFAR-10 データセット)
本手順では、TensorFlow の Convolutional Neural Network のチュートリアル にしたがって、CIFAR-10 (読み方は、シーファー・テン または サイファー・テンと発音されます) という名前のデータセットで、32px × 32px のクラス付け済み画像 60,000 件を用います。
CIFAR-10 では、各画像に、airplane (飛行機), automobile (自動車), bird (鳥), cat (ネコ), deer (鹿), dog (犬), frog (カエル), horse (馬), ship (船), truck (トラック) の 10 個のクラスが付けられており、 学習を行って作成したモデルを用い、与えられた画像が何の画像であるか (=どのクラスに属するか) を判定するモデルを作成します。
各クラスの画像は、次のようになっています。
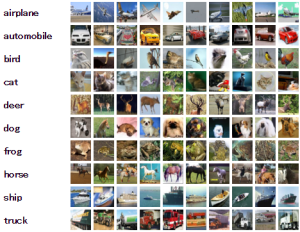
(The CIFAR-10 dataset のページより引用)
データセットの構成は以下です。
- 訓練用 (Training) データ: 50,000 件
- 検証用 (Testing) データ: 10,000 件
データの読み込みと学習の実施
チュートリアルのコード (cifar10_train.py) を実行し、データをダウンロード、解凍してから訓練用データで学習を行います。
以下は、チュートリアルのコードに、日本語で説明を付け加えたものです。
|
1 2 3 4 5 6 7 8 9 10 11 12 13 14 15 16 17 18 19 20 21 22 23 24 25 26 27 28 29 30 31 32 33 34 35 36 37 38 39 40 41 42 43 44 45 46 47 48 49 50 51 52 53 54 55 56 57 58 59 60 61 62 63 64 65 66 67 68 69 70 71 72 73 74 75 76 77 78 79 80 81 82 83 84 85 86 87 88 89 90 91 92 93 94 95 96 97 98 99 100 101 102 103 104 105 106 107 108 109 110 111 112 113 114 115 116 117 118 119 120 121 122 123 124 125 126 127 128 129 130 131 132 133 134 135 136 137 138 139 140 141 142 143 144 145 146 147 148 149 150 |
# -*- coding: utf-8 -*- # Copyright 2015 The TensorFlow Authors. All Rights Reserved. # # Licensed under the Apache License, Version 2.0 (the "License"); # you may not use this file except in compliance with the License. # You may obtain a copy of the License at # # http://www.apache.org/licenses/LICENSE-2.0 # # Unless required by applicable law or agreed to in writing, software # distributed under the License is distributed on an "AS IS" BASIS, # WITHOUT WARRANTIES OR CONDITIONS OF ANY KIND, either express or implied. # See the License for the specific language governing permissions and # limitations under the License. # ============================================================================== """A binary to train CIFAR-10 using a single GPU. Accuracy: cifar10_train.py achieves ~86% accuracy after 100K steps (256 epochs of data) as judged by cifar10_eval.py. Speed: With batch_size 128. System | Step Time (sec/batch) | Accuracy ------------------------------------------------------------------ 1 Tesla K20m | 0.35-0.60 | ~86% at 60K steps (5 hours) 1 Tesla K40m | 0.25-0.35 | ~86% at 100K steps (4 hours) Usage: Please see the tutorial and website for how to download the CIFAR-10 data set, compile the program and train the model. http://tensorflow.org/tutorials/deep_cnn/ """ from __future__ import absolute_import from __future__ import division from __future__ import print_function from datetime import datetime import os.path import time import numpy as np from six.moves import xrange # pylint: disable=redefined-builtin import tensorflow as tf from tensorflow.models.image.cifar10 import cifar10 FLAGS = tf.app.flags.FLAGS # 訓練済データの格納先ディレクトリ (自動的に作成するので、事前にディレクトリを作成する必要はありません) tf.app.flags.DEFINE_string('train_dir', '/tmp/cifar10_train', """Directory where to write event logs """ """and checkpoint.""") # 訓練回数 (100万回⇒1万回に変更) tf.app.flags.DEFINE_integer('max_steps', 10000, """Number of batches to run.""") # True に設定すると、計算用に割り当てられているデバイスをログ出力する tf.app.flags.DEFINE_boolean('log_device_placement', False, """Whether to log device placement.""") # # 訓練を行う関数 # def train(): with tf.Graph().as_default(): global_step = tf.Variable(0, trainable=False) # CIFAR-10.の画像データとラベルを取得 images, labels = cifar10.distorted_inputs() # 予測モデルを計算するためのグラフを作成 logits = cifar10.inference(images) # ロス値を計算 loss = cifar10.loss(logits, labels) # 1回ごとのバッチサンプルを利用して学習し、モデルのパラメータを更新 train_op = cifar10.train(loss, global_step) # Saver (学習途中のデータを保存する機能) を作成 saver = tf.train.Saver(tf.all_variables()) # 処理のサマリを作成 # Build the summary operation based on the TF collection of Summaries. summary_op = tf.merge_all_summaries() # 全ての変数を初期化 init = tf.initialize_all_variables() # セッションを開始し、初期化を実行 sess = tf.Session(config=tf.ConfigProto( log_device_placement=FLAGS.log_device_placement)) sess.run(init) # Queue Runner (キューによる実行) を開始 tf.train.start_queue_runners(sess=sess) summary_writer = tf.train.SummaryWriter(FLAGS.train_dir, sess.graph) # 設定した学習回数分、繰り返し実行 for step in xrange(FLAGS.max_steps): start_time = time.time() _, loss_value = sess.run([train_op, loss]) duration = time.time() - start_time assert not np.isnan(loss_value), 'Model diverged with loss = NaN' # 10 回ごとにロスと学習速度を表示 if step % 10 == 0: num_examples_per_step = FLAGS.batch_size examples_per_sec = num_examples_per_step / duration sec_per_batch = float(duration) format_str = ('%s: step %d, loss = %.2f (%.1f examples/sec; %.3f ' 'sec/batch)') print(format_str % (datetime.now(), step, loss_value, examples_per_sec, sec_per_batch)) # 100 回ごとにサマリを出力 if step % 100 == 0: summary_str = sess.run(summary_op) summary_writer.add_summary(summary_str, step) # 定期的(1,000回毎、または最大学習回数に達した際) 学習したモデルを保存 if step % 1000 == 0 or (step + 1) == FLAGS.max_steps: checkpoint_path = os.path.join(FLAGS.train_dir, 'model.ckpt') saver.save(sess, checkpoint_path, global_step=step) def main(argv=None): # pylint: disable=unused-argument # データセットをダウンロードし、解凍 cifar10.maybe_download_and_extract() # 訓練済データが存在する場合、削除 if tf.gfile.Exists(FLAGS.train_dir): tf.gfile.DeleteRecursively(FLAGS.train_dir) # 訓練済データ格納先フォルダを作成 tf.gfile.MakeDirs(FLAGS.train_dir) # 訓練を実行 train() if __name__ == '__main__': tf.app.run() |
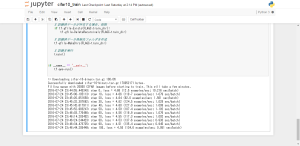
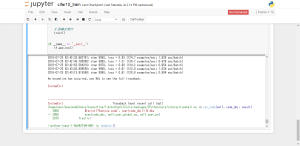
問題なく実行できていれば、以下のようにダウンロードが行われ、学習が進められます。
※ Jupyter Notebook で実行した場合、計算終了時に以下のようなエラーが表示される場合がありますが正しく計算できています。
|
1 2 3 4 5 6 7 8 |
An exception has occurred, use %tb to see the full traceback. SystemExit --------------------------------------------------------------------------- ... TypeError: 'level' is an invalid keyword argument for this function |
検証用データを用いて精度を確認 (モデル評価)
続いて、作成したモデルと検証用データを用いてどのくらいの精度で正しく分類ができたかを確認します。以下コードもチュートリアルのコードを参考に、一部修正したものを実行します。こちらも、チュートリアルのコード (cifar10_eval.py) を参考に、日本語で説明を付け加えたものです。
なお、このモデル評価プログラムは、上記の学習用プログラムを実行中に並行して学習中のモデルの精度を検証しながら、実行できるようになっています。
|
1 2 3 4 5 6 7 8 9 10 11 12 13 14 15 16 17 18 19 20 21 22 23 24 25 26 27 28 29 30 31 32 33 34 35 36 37 38 39 40 41 42 43 44 45 46 47 48 49 50 51 52 53 54 55 56 57 58 59 60 61 62 63 64 65 66 67 68 69 70 71 72 73 74 75 76 77 78 79 80 81 82 83 84 85 86 87 88 89 90 91 92 93 94 95 96 97 98 99 100 101 102 103 104 105 106 107 108 109 110 111 112 113 114 115 116 117 118 119 120 121 122 123 124 125 126 127 128 129 130 131 132 133 134 135 136 137 138 139 140 141 142 143 144 145 146 147 148 149 150 151 152 153 154 155 156 157 158 159 160 161 162 163 164 165 166 167 168 169 170 171 172 173 174 175 176 177 178 |
# -*- coding: utf-8 -*- # Copyright 2015 The TensorFlow Authors. All Rights Reserved. # # Licensed under the Apache License, Version 2.0 (the "License"); # you may not use this file except in compliance with the License. # You may obtain a copy of the License at # # http://www.apache.org/licenses/LICENSE-2.0 # # Unless required by applicable law or agreed to in writing, software # distributed under the License is distributed on an "AS IS" BASIS, # WITHOUT WARRANTIES OR CONDITIONS OF ANY KIND, either express or implied. # See the License for the specific language governing permissions and # limitations under the License. # ============================================================================== """Evaluation for CIFAR-10. Accuracy: cifar10_train.py achieves 83.0% accuracy after 100K steps (256 epochs of data) as judged by cifar10_eval.py. Speed: On a single Tesla K40, cifar10_train.py processes a single batch of 128 images in 0.25-0.35 sec (i.e. 350 - 600 images /sec). The model reaches ~86% accuracy after 100K steps in 8 hours of training time. Usage: Please see the tutorial and website for how to download the CIFAR-10 data set, compile the program and train the model. http://tensorflow.org/tutorials/deep_cnn/ """ from __future__ import absolute_import from __future__ import division from __future__ import print_function from datetime import datetime import math import time import numpy as np import tensorflow as tf from tensorflow.models.image.cifar10 import cifar10 FLAGS = tf.app.flags.FLAGS # 評価結果の格納先ディレクトリ tf.app.flags.DEFINE_string('eval_dir', '/tmp/cifar10_eval', """Directory where to write event logs.""") # 評価用データ tf.app.flags.DEFINE_string('eval_data', 'test', """Either 'test' or 'train_eval'.""") # チェックポイント格納先ディレクトリ(訓練済データの格納先を指定) tf.app.flags.DEFINE_string('checkpoint_dir', '/tmp/cifar10_train', """Directory where to read model checkpoints.""") # 繰り返し実行する場合の実行間隔 (秒) tf.app.flags.DEFINE_integer('eval_interval_secs', 60 * 5, """How often to run the eval.""") # サンプリング数 tf.app.flags.DEFINE_integer('num_examples', 10000, """Number of examples to run.""") # 一度だけ実行 (True) または、繰り返し実行 (False) を指定 tf.app.flags.DEFINE_boolean('run_once', True, """Whether to run eval only once.""") # # 評価を 1 回分実行 # def eval_once(saver, summary_writer, top_k_op, summary_op): """Run Eval once. Args: saver: Saver. summary_writer: Summary writer. top_k_op: Top K op. summary_op: Summary op. """ with tf.Session() as sess: ckpt = tf.train.get_checkpoint_state(FLAGS.checkpoint_dir) if ckpt and ckpt.model_checkpoint_path: # チェックポイントを復元 saver.restore(sess, ckpt.model_checkpoint_path) # Assuming model_checkpoint_path looks something like: # /my-favorite-path/cifar10_train/model.ckpt-0, # extract global_step from it. global_step = ckpt.model_checkpoint_path.split('/')[-1].split('-')[-1] else: print('No checkpoint file found') return # Queue Runner (キューによる実行) を開始 coord = tf.train.Coordinator() try: threads = [] for qr in tf.get_collection(tf.GraphKeys.QUEUE_RUNNERS): threads.extend(qr.create_threads(sess, coord=coord, daemon=True, start=True)) num_iter = int(math.ceil(FLAGS.num_examples / FLAGS.batch_size)) true_count = 0 # 正しく識別できた数を記録 total_sample_count = num_iter * FLAGS.batch_size step = 0 while step < num_iter and not coord.should_stop(): predictions = sess.run([top_k_op]) true_count += np.sum(predictions) step += 1 # 識別率 (精度) を計算 precision = true_count / total_sample_count print('%s: precision @ 1 = %.3f' % (datetime.now(), precision)) summary = tf.Summary() summary.ParseFromString(sess.run(summary_op)) summary.value.add(tag='Precision @ 1', simple_value=precision) summary_writer.add_summary(summary, global_step) except Exception as e: # pylint: disable=broad-except coord.request_stop(e) coord.request_stop() coord.join(threads, stop_grace_period_secs=10) # # 評価を実行 # def evaluate(): with tf.Graph().as_default() as g: # 検証用データとラベルを取得 eval_data = FLAGS.eval_data == 'test' images, labels = cifar10.inputs(eval_data=eval_data) # 予測モデルをグラフとして構築 logits = cifar10.inference(images) # 予測結果から精度 (一致または不一致の割合) を計算 top_k_op = tf.nn.in_top_k(logits, labels, 1) # 学習した変数の移動平均を復元 variable_averages = tf.train.ExponentialMovingAverage( cifar10.MOVING_AVERAGE_DECAY) variables_to_restore = variable_averages.variables_to_restore() saver = tf.train.Saver(variables_to_restore) # Tensorflow のグラフのサマリを行う処理 summary_op = tf.merge_all_summaries() summary_writer = tf.train.SummaryWriter(FLAGS.eval_dir, g) while True: eval_once(saver, summary_writer, top_k_op, summary_op) if FLAGS.run_once: break time.sleep(FLAGS.eval_interval_secs) def main(argv=None): # pylint: disable=unused-argument # データセットをダウンロードし、解凍 cifar10.maybe_download_and_extract() # 訓練済データが存在する場合、削除 if tf.gfile.Exists(FLAGS.eval_dir): tf.gfile.DeleteRecursively(FLAGS.eval_dir) # 訓練済データ格納先フォルダを作成 tf.gfile.MakeDirs(FLAGS.eval_dir) # 評価を実行 evaluate() if __name__ == '__main__': tf.app.run() |
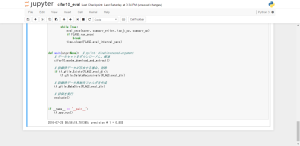
プログラムを実行した結果は以下です。結果によると、0.803 (80.3%) の精度で正しく識別できたことがわかります。
※ Jupyter Notebook で実行した場合、計算終了時に以下のようなエラーが表示される場合がありますが正しく計算できています。
|
1 2 3 4 5 6 7 8 |
An exception has occurred, use %tb to see the full traceback. SystemExit --------------------------------------------------------------------------- ... TypeError: 'level' is an invalid keyword argument for this function |
TensorBoard でモデルを確認
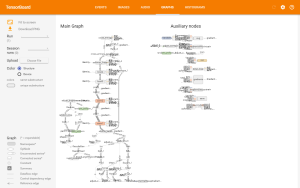
TensorBoard (テンソルボード) は、TensorFlow で作成したモデルや学習状況を可視化するWebアプリケーションです。
以下コマンドを実行すると、ブラウザが起動し、TensorBoard の画面が表示されます。--logdir オプションにて、可視化対象となるディレクトリを指定します。
|
1 2 |
source activate tensorflow tensorboard --logdir=/tmp/cifar10_train |
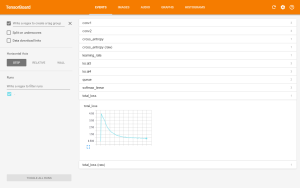
ブラウザ上では以下のように、パラメータの推定状況、モデルを可視化した図などが参照できます。
ロス関数の値の減少状況。10,000 回実行後、0.9 付近で収束しつつあることが一目でわかります。
参考: tensorflow/tensorflow/models/image/cifar10 at r0.9 · tensorflow/tensorflow
Convolutional Neural Networks
